Project Readme
2026-frc-rebuilt
Robot software for the Ludington O-Bots 7160, powering our 2026 FIRST Robotics Competition "REBUILT" season codebase.
Contents
Prerequisites
- Install Git for Windows if you are on Windows. This is required to clone the repository and manage code. (macOS users already have Git pre-installed.)
- Install the
WPILib 2026 release
(bundles Java 17, GradleRIO, and the VS Code extensions). Ensure the WPILib
command-line tools are on your
PATH. - Install
PathPlanner
for trajectory authoring and visualization.
- macOS: install it into the current season’s WPILib folder under a pathplanner subfolder.
- macOS: if you see a malware warning, allow it via System Settings → Privacy
& Security → Open Anyway, or run
sudo xattr -rd com.apple.quarantinefollowed by the PathPlanner app folder.
- Install Node.js (LTS recommended) for draw.io
tooling in this repo, including MCP-based diagram editing and export scripts.
- Verify the install with
node -v.
- Verify the install with
Getting started
- Clone the repository (see GitHub's guide on cloning a repository for step-by-step instructions) and let WPILib import vendordep JSON files automatically when you first open the project.
- Open the repo folder using the WPILib-installed VS Code (the WPILib build of VS Code is required; standard VS Code will not have the WPILib extensions and dependencies bundled).
- Install the recommended extensions when VS Code prompts you. If you don’t see a “Recommended” view, open the Command Palette (Ctrl+Shift+P or Cmd+Shift+P), run “Extensions: Show Recommended Extensions”, and install the workspace recommendations (the WPILib VS Code bundle provides the FRC extensions needed for builds and simulation).
Build and test
- Build and test locally to verify the code compiles and unit tests (if
present) pass:
- Terminal: run
./gradlew build. - WPILib Command Palette: run “WPILib: Build Robot Code”.
- Keyboard shortcuts: press Ctrl+Shift+B (Windows/Linux) or Cmd+Shift+B (macOS).
- Terminal: run
Simulation
- Launch the simulator to exercise subsystems and commands without
hardware:
- Terminal:
./gradlew simulateJava. - WPILib Command Palette: “WPILib: Simulate Robot Code”.
- Terminal:
- Use the WPILib simulator UI to view NetworkTables, control inputs, and AdvantageKit logs while iterating.
Persisting tuned values
When tuning PID gains, motion profiles, or other config values live through
Elastic or AdvantageScope, the changes exist only in NetworkTables and are lost
when the robot restarts. The persist-tuned-values script reads the current
values from the running NT4 server and patches the local subsystems.json so
changes survive a redeploy.
One-time setup
cd scripts && npm install
Usage
Convenience npm scripts are provided in scripts/package.json:
| Script | Target | Config file |
|---|---|---|
npm run persist:prod |
Production robot (team 7160) | subsystems.json |
npm run persist:test |
Test robot (team 7160) | subsystems-test.json |
npm run persist:sim |
Simulator (localhost) | subsystems-sim.json |
Append extra flags after --:
# Preview changes from the simulator without writing
npm run persist:sim -- --subsystem turretSubsystem --dry-run

# Persist turret changes from the production robot
npm run persist:prod -- --subsystem turretSubsystem

# Watch mode — monitor changes live, press Enter to persist
npm run persist:sim -- --watch --subsystem turretSubsystem
You can also call the script directly:
node scripts/persist-tuned-values.mjs --team 7160 --subsystem turretSubsystem
Valid subsystem keys
Use the top-level keys from subsystems.json:
driveBaseSubsystem, turretSubsystem, shooterSubsystem, indexerSubsystem,
robotPoseSubsystem, aprilTagVisionSubsystem, feederSubsystem,
intakeSubsystem, harvesterSubsystem, triggerBindings
How it works
The robot publishes config values to NetworkTables under two namespaces:
- System 2 (preferred):
AdvantageKit/NetworkInputs/SmartDashboard/<ClassName>/<field>— created lazily byAbstractConfig.readTunableNumbervia AdvantageKit'sLoggedNetworkNumber. This is the namespace Elastic edits live. - System 1 (fallback):
SmartDashboard/SubsystemsConfig/<json/path>— seeded at startup byConfigurationLoader.iterateFields. Mirrors the JSON structure exactly.
The script connects via the NT4 WebSocket protocol, reads all SmartDashboard topics for the specified subsystem (including nested motor configs), checks System 2 first and falls back to System 1, then compares against the JSON file and writes back only the fields that changed. Non-tunable fields like CAN IDs, motor inversion, and enabled flags are never modified unless they were edited in Elastic.
In watch mode (--watch), the script stays connected and polls every 2
seconds. When changes are detected it displays them; press Enter to persist or
keep tuning. It automatically reconnects if the robot or simulator restarts.
Known limitations
- Disabled subsystems: If a subsystem is disabled, its getters may never run, so System 2 keys won't exist. The script falls back to System 1 keys (startup seed), which still reflect any edits made in Elastic at that level.
- FMS mode: Tunables are not created when the Field Management System is attached, so the script only works in practice or simulation.
- Class-name collisions: If two nested configs share the same Java class
name (e.g., a leader and follower motor using the same
MotorConfigtype), their System 2 keys collide. The script cannot distinguish them and will apply the value from NT to both JSON entries. Use distinct config classes to avoid this.
Deployment
- Connect to the robot so the roboRIO is reachable:
- USB tether from the laptop to the roboRIO (fastest for pits).
- Ethernet from the laptop to the field/test router (wired is preferred for reliability).
- Team Wi‑Fi (ensure you’re on the robot or practice network and have good signal).
- Deploy using one of these options (all run the same GradleRIO deploy
target):
- Terminal:
./gradlew deploy. - WPILib Command Palette: “WPILib: Deploy Robot Code”.
- Keyboard shortcut: press F5 in the WPILib-installed VS Code.
- Terminal:
- After deployment, bring up your tools to drive and monitor telemetry:
- Open the FRC Driver Station to enable the robot and map joysticks/controllers.
- Launch Advantage Scope to visualize logs and signals.
- Open the Elastic dashboard to watch live telemetry and key widgets.
Documentation
In-repo Markdown files are rendered as styled HTML pages when you run
./gradlew javadoc. The generated site appears under build/docs/javadoc/ and
is published to GitHub Pages so students and mentors can browse without cloning
the repo.
Key starting points:
- Glossary – definitions of robotics and programming terms used throughout the codebase.
- Subsystems index – folder layout, inheritance hierarchy, and links to every mechanism.
- Shared abstractions – the abstract base classes, the set-and-seek pattern, and the disabled-subsystem lifecycle.
For other teams
This repository is public. You are welcome to read, learn from, and adapt any of
the code or documentation. If you have questions, open a GitHub Issue and we
will do our best to help. Please note that the hardware configuration
(subsystems.json, swerve configs, CAN IDs) is specific to our robot — you will
need to adjust those values for your own machine.
Development reference
Project structure
The key folders under src/main you will touch most often are:
deploy/– JSON configs and paths the robot loads at startup, includingsubsystems.jsonand swerve module/controller settings.java/frc/robot/BuildConstants.java– build metadata (git hash, compile time, etc.) injected by Gradle for on-robot diagnostics.java/frc/robot/devices/– reusable device wrappers like controllers.java/frc/robot/shared/– cross-cutting pieces many mechanisms share:bindings/for trigger/input helpers.commands/for abstract command bases.config/for shared config types/loaders.logging/for AdvantageKit and telemetry helpers.subsystems/for abstract subsystem bases.field/for field-target selection helpers.
java/frc/robot/subsystems/<mechanism>/– concrete mechanism code, each with its owncommands/(including command factories),config/, andio/folders.
Pose ownership
RobotPoseSubsystemis the authoritative field pose source for commands and other subsystems.DriveBaseSubsystemprovides odometry only and streams updates into the pose subsystem.- Resetting pose flows through the pose subsystem so the drivebase and estimator stay aligned.
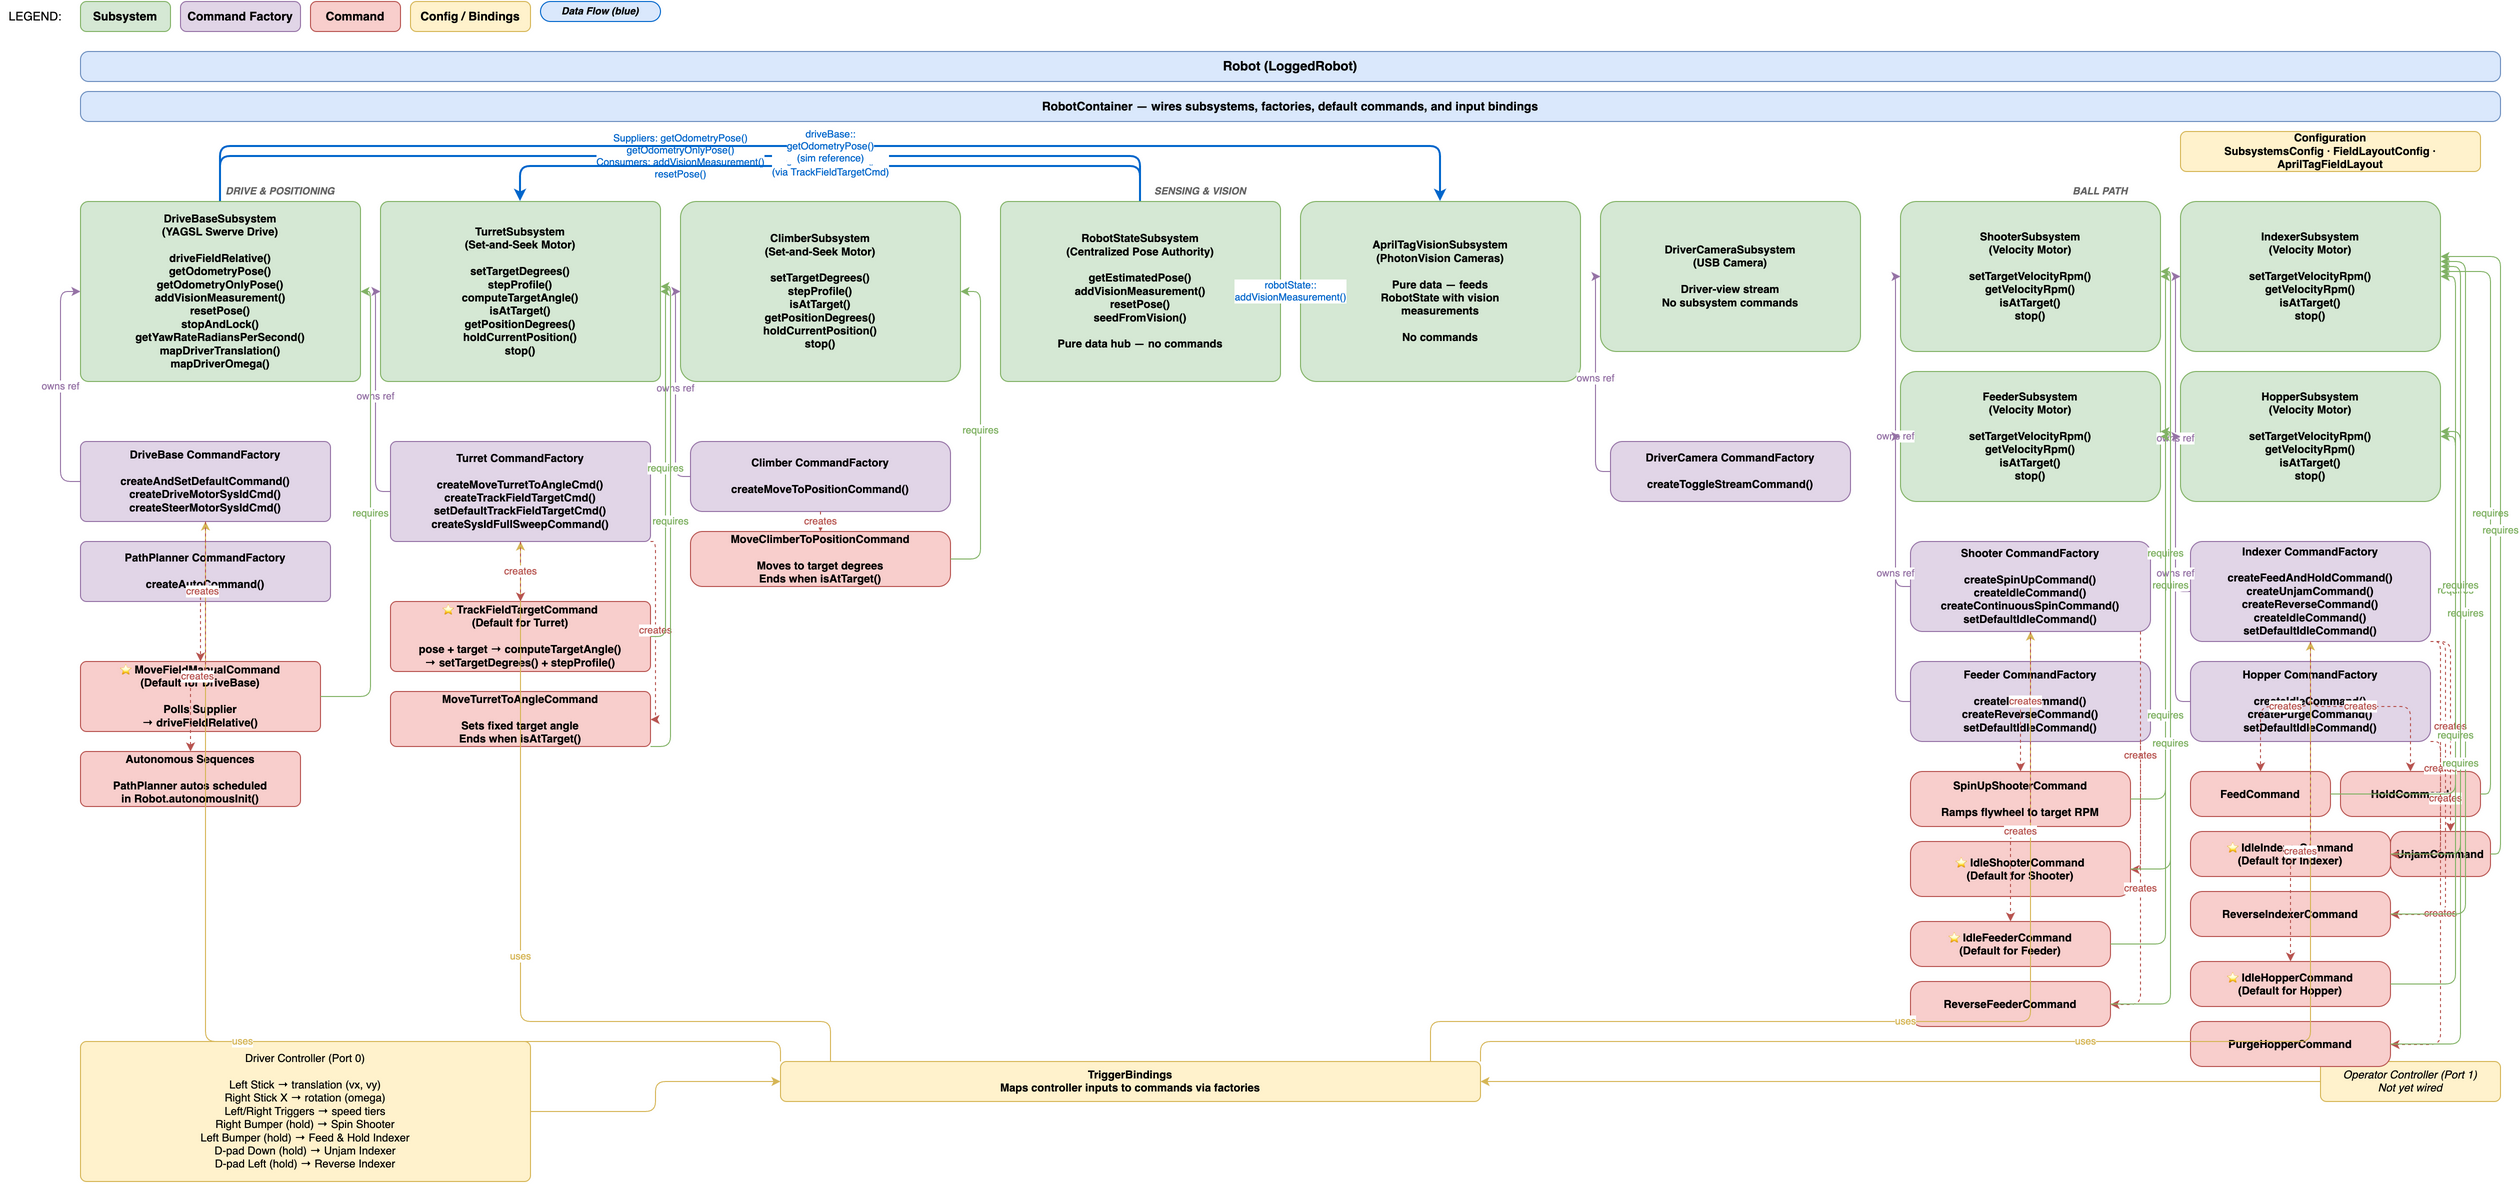
This architecture diagram lives in assets/7160-frc-rebuilt.drawio.svg; open
and edit it with draw.io to keep the visuals
current as the robot evolves.
Dependencies
All third-party libraries live in vendordeps/ and are versioned alongside the
code so WPILib will automatically pull the right artifacts:
- AdvantageKit – provides deterministic telemetry logging and replay so we can diagnose the robot off-field.
- WPILib New Commands – keeps the declarative command-based framework separate so we can stay current with WPILib updates.
- PathPlannerLib – supplies the PathPlanner runtime library for autonomous path following, path loading, and holonomic control helpers.
- YAGSL (Yet Another Generic Swerve Library) – manages the swerve drive
kinematics, control loops, and auto pathing layers for the drivetrain.
- CTRE Phoenix 5 & 6 – covers Talon SRX/Victor SPX legacy controllers (v5) plus Talon FX/CANcoder/Pigeon2 devices (v6) used throughout the drivetrain and mechanisms.
- REVLib – interfaces with Spark MAX motor controllers, NEO brushless motors, and REV sensors used on manipulators.
- StudicaLib – adds support for the Studica control interface hardware that powers our custom operator panel.
- ThriftyLib – supplies device wrappers for ThriftyBot sensors (such as absolute encoders and power modules) integrated into this robot.
These vendordeps are committed so the correct versions ship with every build, ensuring sim, practice, and competition robots stay in sync.